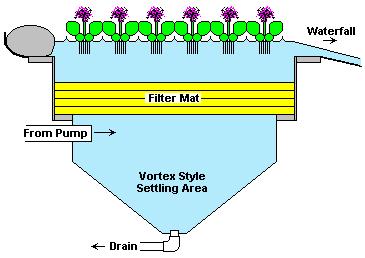
- Dig a hole, 5' wide, 5' long. Create completely vertical walls to the 3' depth.
- Dig down another 2' deep, this time at a 45 degree angle towards the center to form a cone-shaped bottom.
- Dig a shelf into the top perimeter of the hole, 6" wide and 2" deep.
- Dig a 4" wide and 6" deep trench starting at the very bottom of the hole and going up one side. This hole is for the bottom drain line.
- Using the 2" piping, Install the piping for the bottom drain in the hole from step 1. You should have a 6" stub, then a 90 degree elbow, then a 24" pipe, then a 45 degree elbow, then a 24" pipe, then another 45 degree elbow, then a 24" pipe.
- Backfill over the piping. The only pipe that should be visable is a little stub at the very bottom center of the hole.
- Dig a trench from your pump to the corner of the filter. The pipe from your pump should enter the filter at the 3' depth (just above the cone shaped bottom).
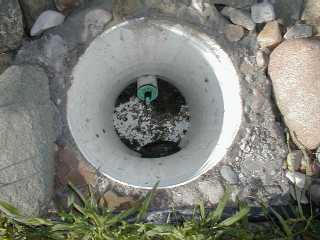
- Install a 5 gallon bucket over the bottom drain pipe. The pipe should be just below water level. Install tile line to drain the water into.
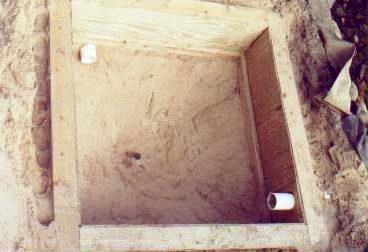
- Using the 2x6 stock (Item C), cut 4 of the boards to a length of 5' - 8"
- Using the remaining 2x6 board, cut 4 pieces, each 16" long.
- Place the four long boards on the ground FLAT in the shape of a square. Butt the end of one board to the side of the adjoining board. This will create a square with an inside dimension of 5' - 2"
- Place the four 16" board over the joints of the frame.
- Use screws to fasten the boards together.
- Place this framework in the top shelf of your hole. The support braces go towards the bottom.
- Remove additional dirt from the shelf to accommodate the support braces so that the entire underneath surface of the frame rests on the soil.
- Plywood Skirt: Using the 4x8 sheet of plywood (Item D), get four boards that are 16" by 5' long. In order to do this, you will have to do some creative cutting. First, cut three 16" wide by 5' long boards. Next using the remaining plywood (3' by 4') Cut a chunk 16" by 4' and one 16" by 1'. Use the remaing plywood scraps to piece the two together to form our fourth piece.
- Screw each one of the four pieces of plywood to the edge of the frame
- Using the 2x4 stock (Item B), cut 4 peices, each 4' - 10 1/2" long.
- Place these four boards on the ground ON EDGE in the shape of a square. Butt the end of one board to the side of the adjoining board.
- Screw the boards togther at each end.
- Place this frame to the very bottom of the plywood skirt.
- Connect the frame to the plywood skirt every 12" with screws.
- The final wood sub-structure should look like this:
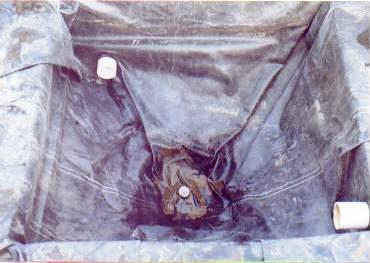
- Before you place the liner in the hole, lay it out flat in the yard.
- Use a tape measure and find the exact center of the liner.
- Cut a 1" diameter hole in the exact center. This hole will be for the bottom drain. If you don't plan on connecting a bottom drain, don't cut this hole !!!
- Place the liner in the filter. Center the hole you just cut over the pipe for the bottom drain at the very bottom.
- Stretch the liner over the pipe and secure with normal pipe boot procedures.
- Fit the liner to the inside of the filter.
- Attach the pipe coming from the pump using the pipe boot procedures.
- Your liner should now look like this:
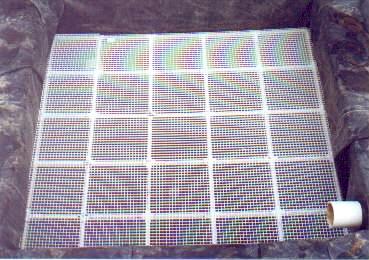
- Using the 1/2" piping (Item H). Cut the piping into 60 peices, each 10 1/2" long.
- Glue the following items together in the following arrangement:
Elbow-Pipe-Tee-Pipe-Tee-Pipe-Tee-Pipe-Tee-Pipe-Elbow
Make Two of these sections. I'll refer to them as end sections later. Make sure you keep all the elbows and tees lined up. - Glue the following items together in the following arrangement:
Pipe-Cross-Pipe-Cross-Pipe-Cross-Pipe-Cross-Pipe
Make four of these sections. I'll refer to these as middle sections later. Make sure you keep all the crosses lined up. - Slide one galvanized rod (Item Q) inside each one of the middle sections.
- Put a Tee on each end to cap the middle section off.
- Take end section (from Step 2) and glue a pipe to each one of the open holes.
- Glue the end section from the previous step to one of the middle sections.
- Continue adding the 3 remaining middle sections to the gridwork.
- Add the remaining end section to the grid.
- Lay the grid down into the filter. It will rest on the lower shelf and should look like
this:

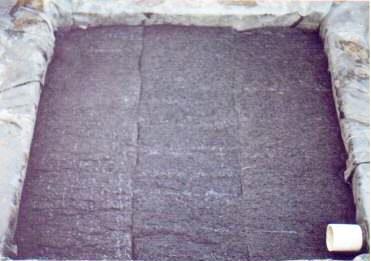
- Cut one of the sheets of eggcrate in half so that you end up with 2 pieces that are 1'x4' each.
- Lay the eggcrate grating over the support grid.
- Cut the Filter Mats into 5' lengths, You should end up with 12 pieces.
- Lay 3 mats in the first row over top of the eggcrate grating.
- Lay the second row in the opposite direction as the first. Example: If the first row runs north to south, the second row runs east to west. This overlapping will prevent channeling.
- Lay the third and forth rows, make sure each is the opposite direction from the last.
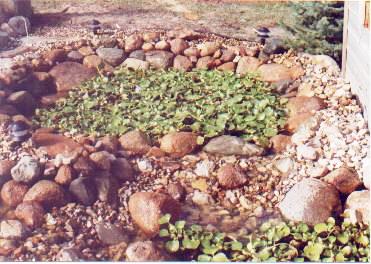
- Add a rock border
- Fill with water
- Add water hyacinths