Design
This article is under construction! As my ideas have evolved, this is the latest design of my filter, so I wanted to included it for reference.
Materials (This list may be incomplete)
| Item | Qty | Description | Size | Cost |
|---|---|---|---|---|
| A | 1 | Pond liner | 10' by 10', 45 Mil | $50 |
| B | 3 | Green treated Boards | 2x10 stock, 12' length | $30 |
| C | 6 | Green treated Boards | 2x10 stock, 8' length | $20 |
| D | 1 | Barrel | 55 Gallon | $10 |
| E | 2 | Stainless Steel Hose clamp | Fits around a 4" elbow (5-8") | $4 | F | 3 | Stainless Steel Hose clamp | Fits around a 3" elbow (3-5") | $3 | G | 1 | Stainless Steel Hose clamp | Fits around a 2" pipe (1-3") | $1 |
| H | 1 | PVC Pipe | 4" dia x 36" long, schedule 20 | $5 |
| I | 1 | PVC Pipe | 4" dia x 10', schedule 40 | $10 |
| J | 1 | PVC Pipe | 3" dia x 30" long, schedule 40 | $2 |
| K | 1 | PVC Pipe | 2" dia x 30" long, schedule 40 | $2 |
| L | 3 | PVC Elbow 90 deg | 4" schedule 40 | $15 |
| M | 1 | PVC Elbow 90 deg | 3" schedule 40 | $5 |
| N | 1 | PVC Coupler | 2" schedule 40 | $1 |
| O | 1 | PVC Cap | 4" schedule 40 | $2 |
| P | 1 | PVC Glue & Primer | 8 Oz cans | $4 |
| Q | 1 | Gate Valve | 3" | $15 |
| R | 1 | Fender Washers | 1/4", 30 per bag | $2 |
| S | 1 | Screws | 2" long, 1 lb box | $3 |
| T | 6 | Media of your choice. I use Bickal Bio-rope | 1 Cubic Feet | DIY IT or Buy IT |
| U | 1 | Drain Cover | 12"-16" diameter. I use a plastic hanging plant basket or a heavy duty plastic bowl, or a stainless steel bowl. |
$10 |
| $260 |
Assembly (about 20 hours)
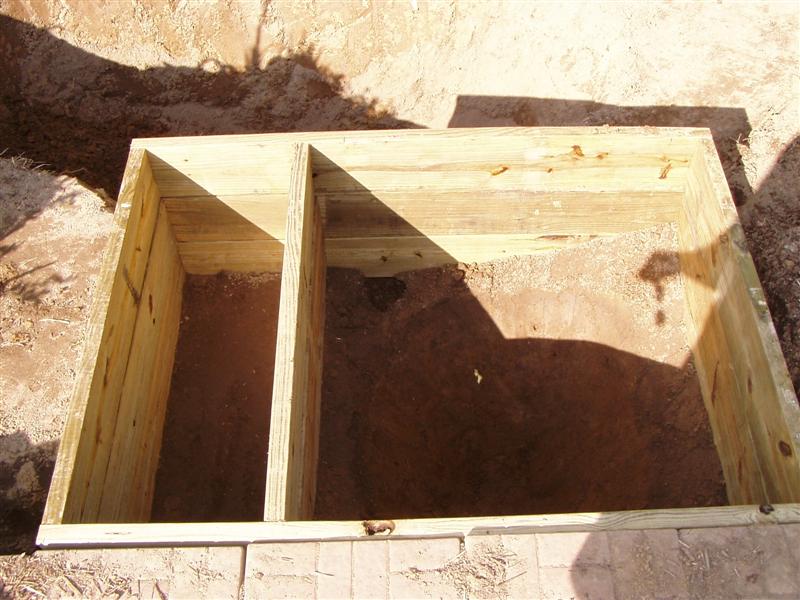
- Dig a hole, 4' wide, 6' long. Create completely vertical walls to the 3' depth.
- Cut the 12' boards in half (6' lengths). Cut the 8' boards in half (4' lengths). Screw them together to make a 4x6 frame. Repeat this and install in the ground.
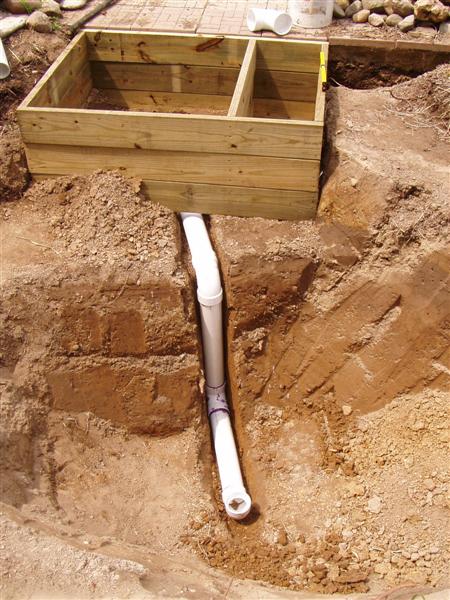
- Install bottom drain piping as necessary. Reference the Air Drain article for details.
- Dig a cone shaped bottom to the settling chamber.
- Optional Step. If you have nowhere to drain your settling chamber too, skip this step. You will have to use a sump pump when you want to clean the settling chamber out.Install Bottom drain piping from the bottom of the settling chamber to a valve in the pumpbox. Minimum 2" line, best 3" line. The line should be able to drain the settling chamber completely dry when you want to flush it. This requires a deep trench.
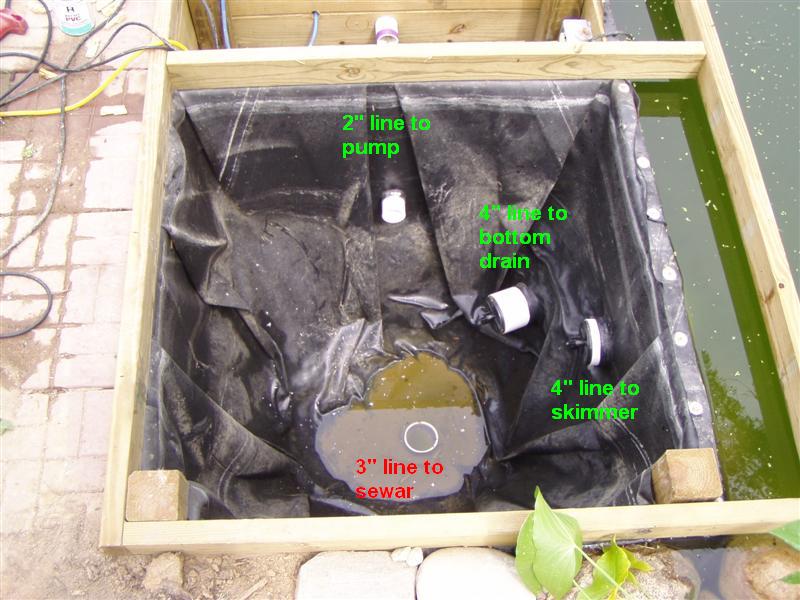
- Optional Step. If you already have differnet plans for a skimmer, skip this step.Cut a 4" diameter hole in the side of the settling chamber. This will be used to make a skimmer.
- Drill a 2" hole through the wood. This will be for connecting the 2" pipe to the pump.
- Install the rubber in the settling chamber. Reference the Pipe Boot article for details.
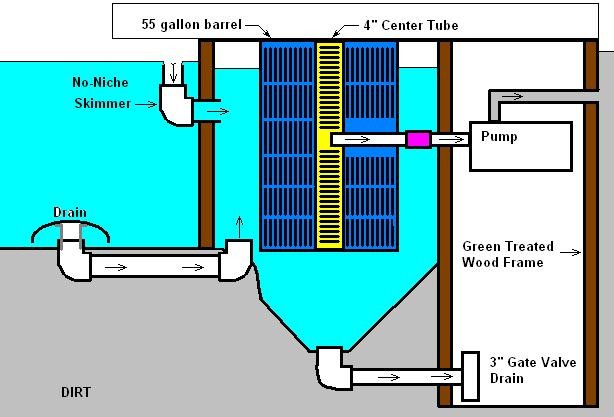
- Build the center barrel. Typically this is a 55 gallon drum. Reference the Static Filter article for details. The pipe which the pump pulls from may exit the barrel through the bottom or through the side, halfway down the barrel, its your choice. I also have found that a 6" center tube makes for more even distribution of water and helps prevent channelling or having the pump suck air from not getting enough flow.
- Mount the barrel inside the settling chamber. I typically hang it from 4 corners, and use 2x4 lumber as my supporting structure.

- Fill the barrel with the media of your choice. Leave the center tube empty. The barrel should be full all the way to the top, but don't pack the barrel full. You want to use a loose fitting media with lots of open space.
