Greg Bickal's DIY Series: Buiding a Waterwheel
I built my waterwheel in my basement during the winter, January 1999 (with much
helpful advice from Ken, from Oregon Waterwheels.) Thanks again Ken !!!
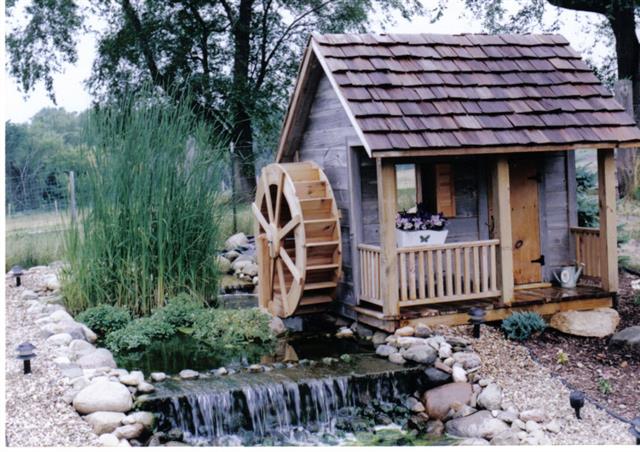
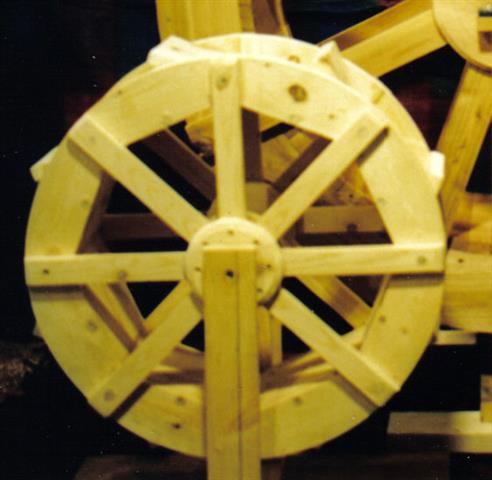
Its made from Cedar Wood. It is 4 foot diameter and 16 inches wide at
the hub. There are 22 paddles. The buckets measure 12 inches wide and 6 inches deep.
The wood for this wheel cost $150. It took me 20 hours to build.
I built the millhouse in September 1998. This millhouse is 6 foot wide by
6 foot long and built to 1/2 scale and meant to resemble my house. The house is build using standard house constructions techniques. The foundation is a floating slab. The walls are standard 2x4 lumber, with plywood sheeting. The siding is old barn boards that I recycled from a friends barn that was falling down. The roof is a 10/12 pitch (trusses), with a 1/2" plywood sheeting, and split Cedar shakes singles. The millpond is only 12" deep and lined with rocks. It is planted with Iris and Watercress.
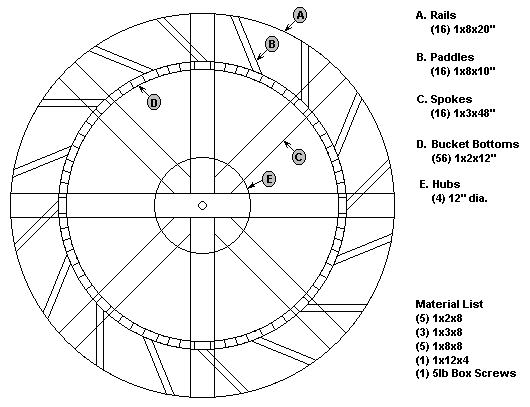
The Design
Assembly
- The Rails
- I cut 8 pieces, each was 20" long and had 22.5 degree on both ends.
For smaller or larger wheels this measurement will vary.
I used 1x8 board for a 4' wheel, larger wheels use 1x12 board. Smaller
wheels use 1x6.
- Drill 2 dowel holes (about 2" apart) in each end of the 8 pieces. In
bigger wheels put 3 dowels in each end.
- Glue & Assemble the 8 pieces together to form an octogon.
- I clamp them to a table to make sure all sides are equal.
- Repeat steps 1-4 for second octogon. (with wheels bigger than 4' diameter,
make 4 octogons).
- using a stick and a pencil, mark out the inside diameter and outside
diameter on the octogon.
- To cut the inside & outside diameters, I attached my router to a board.
The board was anchored to a bolt at the center of the wheel. This allowed
the router to swing around the wheel like the hands of a clock. I cut about
1/4" at each pass. If you dont have a router, use a resiprocating saw.
- The Paddles
- Cut 22 pieces, each is 10" long using the same size board you cut the rails from.
Cut a 45 degree angle on one end. With a larger
wheel you may want 24 or 30 paddles. 16 for a smaller wheel. About 6-8 inches
apart looks the best.
- Divide the ouside diameter of your wheel by the number of paddles. Make marks
along 2 of the rails. Example: The ouside diameter of a 4' wheel is 150.72 inches.
Divide that by 22 and that puts the paddels about 6 7/8" apart.
- Install the paddles at each mark by screwing through the first rail into
the paddle. They should be at 45 degree angles to the rail. The top part
of the paddle should be even with the outside rim of the rail, the bottom
of the paddle (the end with the 45deg. cut should match the bottom). Dont
forget to pre-drill all holes.
- Take the remaining 2 rails and attach them, one to each side of the wheel.
Make sure you rotate the joints. Attach these screwing from the inside of
the wheel. That way you dont have any screws showing from the outside.
- The Spokes
- I used 1x3's. Cut 4 pieces the same lengh as the diameter of your wheel.
These will be the long spokes.
- Use a router to notch the center of the boards. This will allow you to
put two together and form a "plus sign".
- Cut 8 pieces the same length as the radius of the wheel. These will be
the short spokes. Cut a 45 degree angle on both corners of one end
(so that it looks like an arrow.
- Bucket Bottoms
- I used 1 1/2" wide boards. They were 1" thick but thinner is better.
Divide The inside circumfrence of wheel (in inches) by the width of your boards.
Example: The inside diameter of a 4' wheel is 40 inches, so the circumfrence is
104.67 inches, divide by 1.5 = 70 boards.
Cut the boards the same width as the outside diameter of the wheel.
- Drill a hole in each end of each board, then screw to the inside of the
rails. Glue each piece on the bottom and side for a tight fit.
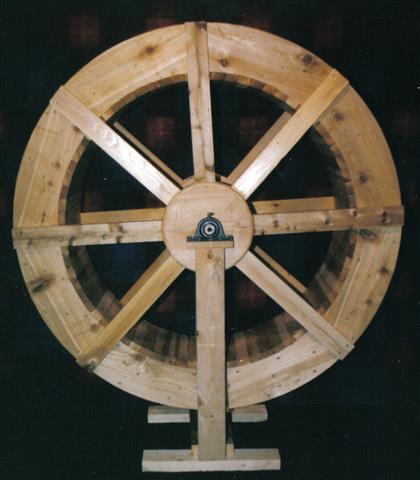
- The Hubs
- Cut 4, 12" diameter hubs.
- Screw 2 long spokes to one hub. Screw throught he spokes into the hub
not the other way around. That way your screws will be hidden.
- Screw 4 short spokes to that hub. Same way. Measure distances to ensure
they are all even.
- Cap that off with the second hub peice. So you should have the spokes
sandwiched between two hub pieces. To attach this second hub, screw
from the outside of the hub into the spokes. Reverse of before. These
screws will be visable, but you will be putting this side of the hub
to the inside of the wheel.
- Screw spokes to wheel. Make sure the hub is dead center.
- Repeat for other side of wheel.
- Drill holes in hub for axle. And you are done.
- The Axle
The axle is a 1/2" galvanized pipe (like gas pipe). A metal flange is welded to
the pipe and the wheel is connected to the flange. The axle rotates on pillow bearings.
- The Sluce
The sleuce is made of 1x8 Cedar also. The interior of the sleuce is lined with a piece of
45mil EPDM rubber, which is folded in half. The water does not come into contact with the wood. The rubber extends out past the wood about 1/4" to provide a nice waterfall. The wood has to rough and thick to do this. A sharp edge creates the best water sheen.

- The Water Pump
The pump which turns the waterwheel is a tiny 300gph Little Giant fountain pump. It draws water from the millpond, and then pumps it to the sleuce through 1/2" cpvc pipe. The pipe is connected to the rubber inside the sleuce using my standard Pipe Boot fitting.
I have built one other waterwheel from instructions that were in the September 1992 issue of Popular Woodworking (Issue #68). The wheel was 2' diameter, and is pictured below.
© Copyright 2004 Greg S. Bickal. All Rights Reserved.